
This is the second in a series of posts on the creation of my interactive number-guessing game, which for the moment is called “Numbers Up”—I hope you like the name! The game is available on jsFiddle if you want to give it a whirl or tinker with the code.

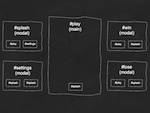
In the first post of the series I discussed the creation of the basic wireframe for the game. To summarize, I decided that the game’s user interface required five screens:
- A screen for the game interface;
- A “splash” (or introductory) screen;
- A screen where the game’s settings could be adjusted;
- A screen that would display in the event of the player’s winning the game; and
- A screen that would display in the event of the player’s losing the game.
I also decided that the screen for the game interface should occupy the main window, while the four other screens should be represented by modal dialogs.
First I’ll discuss the game interface screen. The HTML structure for the screen appears as follows:
<div id="outer-wrapper">
  <div id="inner-wrapper">
    <div id="play">
      <h1>Numbers Up</h1>
      <div id="game-board">
        <div id="gauges">
          <div id="guess">
            <span class="label">Current</span>
            <span class="value">
              <!-- guess -->
            </span>
          </div>
          <div id="guess-accuracy">
            <span class="label">Low/High</span>
            <span class="value">
              <!-- guess accuracy -->
            </span>
          </div>
          <div id="guesses-allowed">
            <span class="label">Allowed</span>
            <span class="value">
              <!-- guesses allowed -->
            </span>
          </div>
          <div id="guesses-made">
            <span class="label">Made</span>
            <span class="value">
              <!-- guesses made -->
            </span>
          </div>
          <div id="guesses-remaining">
            <span class="label">Remaining</span>
            <span class="value">
              <!-- guesses remaining -->
            </span>
          </div>
        </div>
        <div id="tiles">
          <!-- tiles -->
        </div>
      </div>
      <div class="buttons">
        <a href="#splash" class="button button-red dialog">Quit</a>
      </div>
    </div>
  </div>
</div>
Notice the comments that appear in div#tiles (a container for the game board tiles) and the span.value elements (containers for the game board gauge values). These comments represent content that was to be inserted into the DOM dynamically via JavaScript. I’ll return to the subject of the gauge values in a future post. I’ll tackle the subject of the game board tiles right away, however, as these would need to be inserted into the DOM before any user events could be attached to them. My prepareTiles function does just this:
function prepareTiles () {
  var tiles = '',
	  tile,
	lowTile = settings.lowTile,
	highTile = settings.highTile;
  for (var i = lowTile; i < (highTile + 1); i++) {
	tile = '<a class="tile" href="#' + i + '">' + i + '</a>';
	tiles += '
‘; } $(‘#tiles’).append(tiles); }
In this function I use a JS for loop to build an HTML string representing the game board tiles. The loop begins at the number of the lowest tile (lowTile) and ends at the number of the highest tile (highTile). After the loop has finished I use jQuery’s append method to insert the HTML string into the DOM. Notice that the entire HTML string is built before it’s appended to the DOM. This way the DOM needs to be accessed only once rather than the 100 times it would need to have been accessed had each tile been appended individually–an important performance consideration. The settings object I refer to during the function’s variable instantiation relates to an object I created to store information about the game, such as UI strings, overlay properties, and, in this case, the numbers of the lowest and highest tiles.
My next task was to prepare the modal dialogs. Each dialog is represented in the HTML structure by a div element with a class of “dialog”. To transform these frumpy HTML elements into sexy modal dialogs I used the Overlay component provided by the jQuery Tools UI library. My prepareDialogs function takes care of this:
function prepareDialogs () {
  $('div.dialog').each(function (index) {
	var el = $(this);
	(index === 0) ? el.overlay($.extend({}, overlays.attributes.basic, overlays.attributes.autoload)) : el.overlay(overlays.attributes.basic);
  });
}
In this function I use jQuery’s each method to loop through the collection of div.dialog elements. I then call jQuery Tools’ overlay method on each element in the collection to bestow it with modal-dialog functionality. The element that appears first in the collection (i.e., the element whose index is equal to zero)—in this case, the div element containing the splash screen content—is required to load automatically, while the other dialogs are required to load manually (i.e., upon the activation of some triggering element). To implement this distinct functionality, I use jQuery’s extend method to merge two separate configuration objects. The first object stores properties common to all overlays; the second object stores properties common to automatically triggered overlays. The following code snippet, which forms part of the settings object I introduced earlier, represents the configuration objects:
…
overlays: {
  attributes: {
    basic: {
      closeOnClick:false,
      mask: {
        color:'#333',
        loadSpeed:100,
        maskId: 'mask',
        opacity:0.75,
        zIndex:9998
      },
      oneInstance:false
    },
    autoload: {
      load:true
    }
  }
}
…
My next task was to prepare the elements that would act as triggers for the modal dialogs. If you examine the first of the UI diagrams you’ll see that six such elements exist:
- The splash button in the game-board screen
- The settings button in the splash dialog
- The first splash button in the settings dialog
- The second splash button in the settings dialog
- The splash button in the win dialog
- The splash button in the lose dialog
Each button is represented in the HTML structure by an a element with a class of “dialog.” My prepareDialogTriggers function bestows each element with its dialog-triggering functionality:
function prepareDialogTriggers () {
  $('a.dialog').each(function () {
	var el = $(this),
	  href = el.attr('href'),
	  id = href.slice(1);
	el.attr('rel', href).overlay(overlays.attributes.basic).bind('click', function (e) {
	  openOverlay(id);
	  e.preventDefault();
	});
  });
}
In this function I again turn to jQuery’s each method, this time to loop through the collection of a.dialog elements. The href variable saves the value of the a element’s href attribute; the id variable saves the value of the anchor’s href attribute excluding the hash mark (i.e., the value of the id attribute of the div element corresponding to the dialog to be triggered). For the sake of jQuery Tools’ overlay method, I then add to each anchor element a rel attribute using the value saved in the href variable. I then call jQuery Tools’ overlay method on the a element, passing a configuration object to the method specifying that the dialog should be loaded manually. Finally I use jQuery to attach a click event to the anchor element, specifying the requisite additional behavior in the event’s callback function. jQuery users will know that the preventDefault method, when attached to an event object, cancels the default behavior that occurs upon the firing of an event—in this case, it prevents the browser from resolving the URL found in the a element’s href attribute. My openOverlay function, meanwhile, specifies additional behavior that’s required for the purposes of my particular application:
function openOverlay (id) {
  $('div.dialog').hide();
  $.mask.getMask().show();
  $('div[id=' + id + ']').show();
}
In this function I use jQuery’s hide method to hide all other div.dialog elements. I then use the jQuery Tools API to retrieve and show the UI library’s overlay mask (the darkened background that appears when a modal dialog is opened). I then use jQuery’s show method to show the necessary dialog, i.e., the div element with an id attribute whose value corresponds to the value saved in the prepareDialogs function’s id variable, which is passed into openOverlay as its only argument.
With that said (and the word count of this post rapidly approaching the 1250 mark!), I’ll conclude this week’s installment. Be sure to come back next week for another!

