
This is the first in a three-part series of posts on deploying a Docker application to AWS Elastic Beanstalk with AWS CodeSuite. The Docker application in question is this blog, a WordPress application backed by a MySQL database.
I’ve recently been updating the technical infrastructure for this blog. My aim has been to use AWS as much as possible, partly for convenience and partly for education. Having recently migrated the blog from EC2 to Elastic Beanstalk (EB), my latest project has been to refactor the blog’s build-and-deployment workflow to use AWS, specifically some of the services within the CodeSuite toolset. I’ll be writing some posts over the coming weeks to describe what this project involved.
Given that the new workflow ended up being rather more complicated than the old one (which was based on GitHub Actions and EB CLI), I’ll begin by summarizing the refactored version’s design.
Design summary
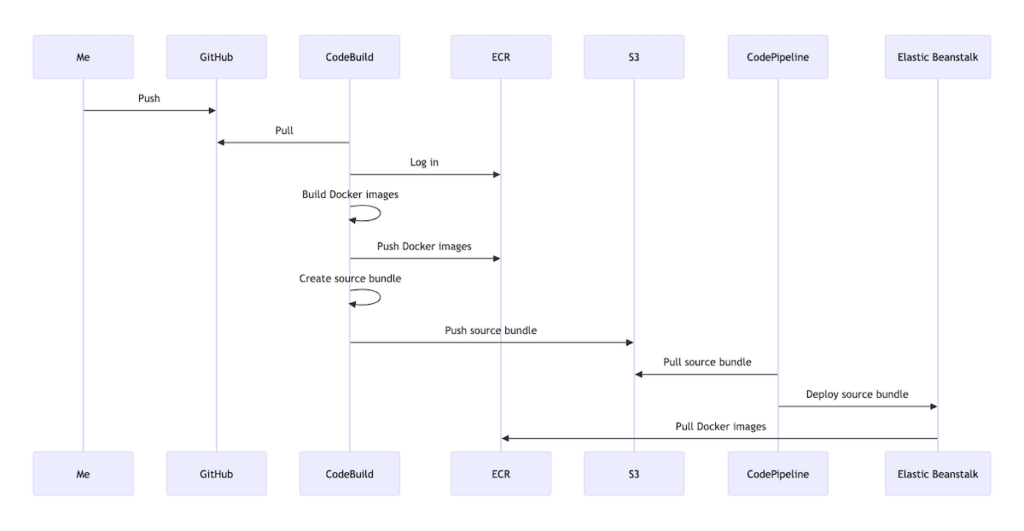
Following is the basic sequence of events I outlined for the new workflow:
- I push a commit to my GitHub repository
- CodeBuild pulls the code from GitHub and initiates a build
- CodeBuild logs in to ECR
- CodeBuild builds the Docker images, tags them and pushes them to ECR
- CodeBuild builds a source bundle for EB and pushes it to S3
- CodePipeline pulls the source bundle from S3 and deploys it to EB
- EB pulls the Docker images from ECR and starts the application
Or, to express this as a diagram…
For anyone who is not familiar with the AWS services involved in this workflow, following are some brief explanations of these:
- CodeBuild is a continuous-integration (CI) service that orchestrates the build phase of the build-and-deployment process.
- CodePipeline is a continuous-deployment (CD) service that orchestrates the overall build-and-deployment process.
- ECR is a container registry that provides remote storage for Docker containers.
- S3 is a general-purpose object storage service.
- EB is a Platform-as-a-Service (PaaS) product that facilitates the deployment of Web applications built on different platforms, e.g., Docker, Node.js, etc.
I’ll now go into how I implemented this high-level design, starting with how I integrated my GitHub repository with AWS, given that pushing a commit to the repository needs to trigger a run on CodeBuild.
Integrating GitHub and AWS
To integrate my GitHub repository with AWS, I installed the “AWS Connector for GitHub” application to my GitHub account–applications can be installed to a GitHub account via the account’s Settings.
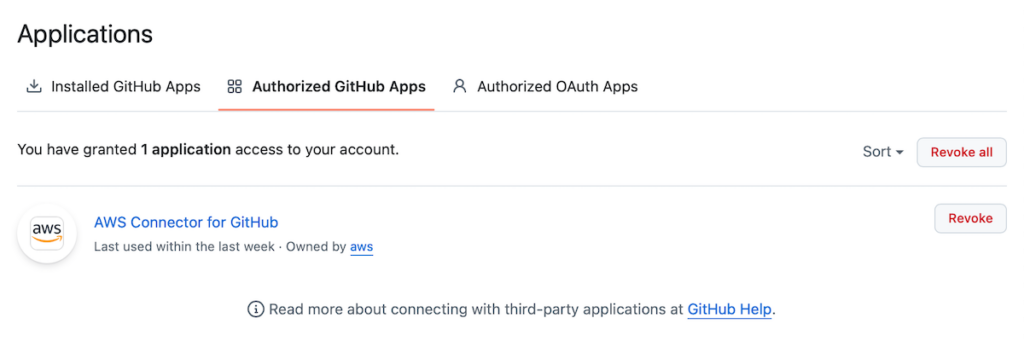
Once the application is installed, it’s possible to authorize it to access either all or only select repositories within an account.
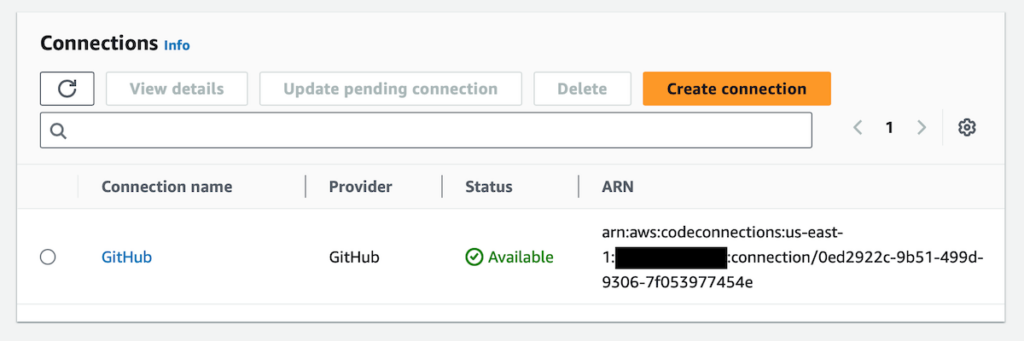
Via the AWS Developer Tools Settings, I then created a connection resource. For this I just needed to choose GitHub as the Provider for the connection; AWS then allowed me to select my specific “AWS Connector for GitHub” installation. Saving the connection resulted in it being available on the Connections page of AWS Developer Tools.
With the connection between GitHub and AWS established, I was now in a position to create the CodeBuild project, the central component of the overall pipeline.
Creating the CodeBuild project
Creating a CodeBuild project generally involves two main steps:
- Configuring a CodeBuild project via AWS
- Adding a buildspec to a repository for the CodeBuild project to read from
For anyone who is not familiar, a CodeBuild project is a configurable job that focuses on the build stage of a CI/CD pipeline, while a buildspec is a YAML file that defines specific instructions for a CodeBuild project.
As I mentioned in the design summary, the two main side effects of my build stage are (1) for Docker images to be pushed to ECR and (2) for an EB source bundle to be uploaded to S3. I’ll address these specifics in a subsequent post; for the rest of this one I’ll focus on the rudiments of adding the buildspec and configuring the CodeBuild project.
Adding the buildspec
To keep things as simple as possible, then, following is an example of a skeletal buildspec:
version: 0.2
phases:
  build:
    commands:
      - echo Hello, world!
artifacts:
  files:
    - 'test.txt'
In this example, “version” specifies the latest buildspec version, while “phases” specifies the commands CodeBuild should run during each phase of the build. For demo purposes I am using a single phase (“build”) and a single command (“echo Hello, world!”). Under “artifacts”, I am also specifying a single file (“test.txt”) that CodeBuild should consider to be an artifact of the build process.
Like I say, meat will be added to the bones of this buildspec in a subsequent post. For now, though, I’ll move on to discussing how to configure the CodeBuild project to read from the buildspec.
Configuring the CodeBuild project
CodeBuild projects are highly configurable. For the purposes of my buildspec, though, there were relatively few settings I needed to change from their defaults–these are itemized below. (Note the important prerequisite of creating an S3 bucket in which to store the build artifact.)
- Project configuration
- Project name: <PROJECT_NAME>
- Project type: Default project
- Source
- Source 1 – Primary
- Source provider: GitHub
- Repository: Repository in my GitHub account
- Repository: <REPOSITORY>
- Source version: <BRANCH>
- Source 1 – Primary
- Buildspec
- Build specifications
- Use a buildspec file: true
- Build specifications
- Artifacts
- Artifact 1 – Primary
- Type: Amazon S3
- Bucket name: <BUCKET_NAME>
- Artifacts packaging: Zip
- Artifact 1 – Primary
With the CodeBuild project thus configured, pushing a commit to my GitHub repository on the relevant branch successfully kicked off a CodeBuild run. Runs are logged in the CodeBuild project’s Build History.

As designed, the run resulted in a compressed version of the build artifact being uploaded to the configured S3 bucket.
Conclusion
In this post I’ve addressed the first two steps of the design summary I provide above: pushing a commit to GitHub and initiating a CodeBuild run. In a subsequent post I’ll aim to address the remaining CodeBuild-related steps of the design summary: logging into ECR; building and tagging the Docker images, and pushing them to ECR; and pushing the EB source bundle to S3.