Comparing Marionette and React

The JavaScript landscape is changing rapidly. If you’re anything like me you’ll know that trying to keep current amidst the churn can be frustrating. We can but try, however. To this end I’ve been learning about React and thinking about how it compares to another UI library I’ve used in the past: the Backbone-based library, Marionette.js.

Why React?

  1. React is relatively well-liked. In the 2016 State of JavaScript “Frameworks” survey 3044 respondents claimed to have used React before, 92% of whom claimed they would use it again. React achieved the highest satisfaction rating, Vue finishing a close second with 89%. Vue had only a fraction of React’s users, however: Only 577 respondents claimed to have used it before. Angular 2 (1092/65%), Ember (850/48%) and Angular (3391/47%) lagged significantly behind React and Vue in one or both regards.
  2. Marionette is relatively obscure. In the same survey Marionette was mentioned by just 41 respondents. No data was given for whether these respondents had used it before or would use it again. Meanwhile Backbone, upon which Marionette is based, acquired a relatively low satisfaction rating: Although a relatively high number of users (2077) claimed to have used it before, only about one-third (32%) claimed they would use it again.
  3. React is more library than framework. Unlike full-blown JavaScript frameworks such as Angular, React is mainly a view library. In this sense it it tempting to see React as a more direct replacement for Marionette, much of whose value in my opinion comes from the views it provides. In principle I tend to prefer libraries over frameworks, chiefly because the latter tend to be more prescriptive in terms of how apps should be constructed.

In summary React appears to be a pretty safe choice that should provide a natural progression from Marionette. Let’s put that to the test by creating an app. We’ll implement a simple ticking clock (featured in the React docs) doing it in both Marionette and React so we can compare.

Creating an application

When creating a JS app it’s nice to have a single object that serves as an entry point to the rest of the UI. Both Marionette and React embrace this concept: Marionette via a dedicated Application class; React via a top-level Component that serves as a parent to other, “child” components. So let’s begin implementing our ticking clock by creating a simple application.

Requirements

  • Output “The time according to {library} is:” to the page

Code

Marionette implementation

To implement the requirement in Marionette:

  1. We created a callback function (onStart) for adding a view containing the output to the DOM. This function runs when the application starts. It first creates a region for showing the view, then creates the view, then shows the view in the region.
  2. We created an instance of the Application class.
  3. We attached an event listener (“start”) to the application instance, passing it the callback function defined in #1.
  4. We started the application via the “start” method on the application instance.

React implementation

To implement the requirement in React:

  1. We created a component for adding the output to the DOM. In this case the component is a functional component but as we’ll see later it could also have been a class component.
  2. We added the output to the DOM via ReactDOM.render. This method basically just merges our component with the DOM, similar to Marionette’s region.show method in #1 above.

Analysis

We can see that React makes life a little easier for getting an app off the ground. While Marionette introduces several different concepts right off the bat (Applications, Regions and Views), React introduces just one (Component). React also appears to do things a little more automatically, e.g., no need to officially start the application or create a listener for the start event. React’s syntax also ends up being cleaner and more terse.

Character count

  • Marionette: 296
  • React: 121

Nesting views

Another essential feature of a JS view library is the ability to nest one view within another view. Nested views reflect the treelike structure of the DOM tree and help to encapsulate functionality within clearly defined modules. Both Marionette and React embrace the concept of nested views: Marionette via its dedicated LayoutView class; React via components. So let’s enhance our fledgling app to illustrate how nested views work in each case.

Requirements

  • Add a view for displaying the title
  • Add a view for displaying the clock

Code

Marionette implementation

To implement the requirements in Marionette:

  1. We added two regions to our LayoutView: one for the title, one for the clock. The LayoutView is a special type of view provided by Marionette distinctly for layout purposes.
  2. We created a callback function (onShowLayoutView) for adding views to the regions defined in the layout view. This function runs after the layout view has been added to the DOM.
  3. We attached an event listener (“show”) to the layout view, passing it the callback function defined in #2. Waiting for the parent view to be added to the DOM before attempting to add the child views ensures Marionette will not try to add the latter before the former is ready.

React implementation

To implement the requirements in React:

  1. We created two user-defined components (AppHeader and AppBody) to represent the nested views.
  2. We rendered the nested components in the parent component using the latter’s “render” method.

Analysis

React again seems to make things easier for us. Marionette introduces yet another concept (ItemView); React allows us to reuse an existing one (Component). Marionette makes us do more work (e.g., we have to manually instantiate all new objects); React does this work for us (we can simply define a component declaratively and React will create it for us). React’s syntax again ends up being cleaner and more terse.

CHARACTER COUNT

  • Marionette: 639
  • React: 252

Managing state

The concept of state as it applies to JS apps is admittedly rather new to me: With hindsight I suppose it’s just one of those things I’ve been doing with JS/jQuery/Backbone/Marionette without really thinking too much about how I’m doing it.

To be going on with let’s just define managing state as managing change. In the context of an app the source of change could be manual or automatic. For example:

  • A user enters a value in a text box (manual)
  • A timer updates a value every so often (automatic)

What these cases have in common is that something happens in the app and the app has to respond somehow. In other words, the app must undergo a change in state.

Once again let’s illustrate this by way of our app, this time by implementing the ticking behavior of the clock.

Requirements

  • Store the date so that it can be updated
  • Set a timer to update the date every second
  • Display the date (and redisplay it whenever it’s updated)
  • Clear the timer if the component is ever removed from the page

Code

Marionette implementation

To implement the requirements in Marionette:

  1. We created an ItemView to represent the clock.
  2. We created a Backbone model to store the date, passing the model into the view.
  3. We created a timer (setInterval) for updating the date and set it to update the model’s date attribute every second. We did this within view’s constructor function (initialize).
  4. We created an Underscore template for displaying the date, saving it to the view’s template property.
  5. We instructed Marionette to re-display the view whenever the model’s date attribute changes. For this we used the view’s modelEvents property.
  6. We instructed Marionette to clear the timer if the view is ever removed from the DOM.

React implementation

To implement the requirements in React:

  1. We created a component to represent the clock.
  2. We stored the date in the component’s local state.
  3. We created the timer for updating the date and set it to update the component’s local state every second. We did this in the component’s componentDidMount lifecycle method. This method is called after the component has been rendered to the DOM.
  4. We created a JSX expression for displaying the date, outputting it right there in the component’s render method.
  5. We instructed React to clear the timer if the component is ever removed from the DOM. We did this in the component’s componentWillUnmount lifecycle method.

Analysis

Marionette and React are a little more in line with each other here. There are a similar number of steps involved in implementing this functionality in either framework. The only major difference appears to be related to re-displaying the date. We have to instruct Marionette explicitly to listen for changes to the model so that it knows when to re-display the view. React, on the other hand, propagates changes in state to the component via props.

CHARACTER COUNT

  • Marionette: 976
  • React: 552

Conclusion

Clearly this comparison only touches on the basics of Marionette and React. Equally clearly our ticking clock app is simplistic to say the least. Nonetheless I think the exercise serves to illustrate some interesting differences between the two libraries, differences that for the most part come down in favor of React.

  • I like React’s declarative nature. React seems to do a bit more of the grunt work for us than Marionette. React allows us to declare components; Marionette makes us create objects.
  • I like React’s functional components. Functional code, characterized by pure functions and immutable data, in theory produces more reliable results than object-oriented code. React leans toward the former; Marionette, the latter.
  • I like React’s state management. With React, changes in state are automatically propagated to components via props. With Marionette, again there may be some manual work involved depending on your use case.

Site, resurrected

Lately I’ve been busy resurrecting this site, using Docker containers to automate the creation of the runtime environment. In case you haven’t heard of Docker containers, here’s what the official Docker site has to say about them:

Docker containers wrap a piece of software in a complete filesystem that contains everything needed to run: code, runtime, system tools, system libraries – anything that can be installed on a server. This guarantees that the software will always run the same, regardless of its environment.

While a technology like Docker is probably more likely to be used for enterprise applications, the need for software to “always run the same” is just as applicable to personal sites like this. In this post I’ll try to show you how I’ve leveraged Docker to bring some consistency to my site’s development and production environments.

Software requirements

A WordPress site such as this needs a few different pieces of software in order to run:

  • WordPress
  • Apache HTTPD (for serving WordPress files)
  • MySQL (for storing WordPress data)

Without something like Docker I would have to install and configure this software manually both on my local machine (for development) and on my remote machine (for production). With Docker, however, I can simply create some YAML-based config files and have the Docker Compose component do the work for me. Following’s how I did this.

Docker Compose config

To define the software requirements, or “services” in Dockerspeak, I created three config files: one config file per environment (development and production) and one config file for the attributes of the services that are common to these environments.

common-services.yml
Contains service definitions for development and production.
docker-compose.yml
Contains service definitions for development only. Extends services defined in common-services.yml via the extends config option.
docker-compose.production.yml
Contains service definitions for production only. Extends services defined in common-services.yml via the extends config option.

MySQL service definition

The MySQL service definition is identical in both development and production. As such it can be defined in common-services.yml and brought into a specific environment by extension.

Here’s the definition (from common-services.yml):

services:

...

  wordpressdb:

    image: mysql:5.7

    container_name: wordpressdb

    env_file: ./wordpressdb/env/wordpress.common.env

    volumes:

      - ./wordpressdb/cnf:/etc/mysql/conf.d/

      - ../data:/var/lib/mysql

...

volumes:

  data:

… and here’s the extension (from docker-compose.yml and docker-compose.production.yml):

  wordpressdb:

    extends:

      file: common-services.yml

      service: wordpressdb


MySQL service config options

image
Defines the MySQL image upon which to base the container.
container_name
Defines the name to use for the container. Not strictly necessary but without it Docker will create a name by itself.
env_file
Points to a plain-text file that defines environment variables that will be accessible within the container, e.g., the username and password for the database.
volumes
Defines directory mappings between host and container. One such mapping is a data volume that will be used to persist data to the host. (See top-level volumes config option in common-services.yml.)

WordPress service definition

The WordPress service definition has some differences between development and production. As such it can be defined in part in common-services.yml and extended in a specific environment.

Here’s the definiton (from common-services.yml):

  wordpress:

    image: wordpress:4.7-apache

    container_name: wordpress

    ports:

      - 80:80

… and here’s the extension (from docker-compose.yml and docker-compose.production.yml):

  wordpress:

    extends:

      file: common-services.yml

      service: wordpress

    volumes:

      - ../html:/var/www/html

      - ./wordpress/conf:/etc/apache2/sites-available

    links:

      - wordpressdb:mysql

    env_file:

      - ./wordpress/env/wordpress.common.env

      - ./wordpress/env/wordpress.${environment}.env

WordPress service config options

image
Defines the WordPress image upon which to base the container. This particular version of WordPress includes Apache HTTPD, so I don’t have to worry about creating a separate service just for this.
container_name
Defines the name to use for the container.
ports
Defines port mappings between host and container. In this case port 80 on the host is being mapped to the same port on the container. This allows me to run the site on the default HTTP port in both development and production.
volumes
Defines directory mappings between host and container. In this case the config tells the container where on the host it can expect to find the WordPress files and the Apache vhost config file.
links
Allows the WordPress container to access the MySQL container.
env_file
Points to a plain-text file that defines environment variables that will be accessible within the container. In this case there are two such files: one for environment variables that are common to environments and one for environment variables that are specific to an environment, e.g., WP_SITEURL, WP_HOME.

Building the services

With this configuration in place it becomes trivial to build the services for development and production.

To build for development I can simply update my repo on my local machine and enter the following command: docker-compose up --build -d. This command will combine the config from common-services.yml and docker-compose.yml and use the result.

To build for production I can simply update my repo on my remote machine and enter the following command: docker-compose -f docker-compose.production.yml --build -d. This command will combine the config from common-services.yml and docker-compose.production.yml and use the result.

Organizing Passwords, PII and Email

As I prepare to start a new job on Monday, the first new job I’ll have started for more than seven years (God, please don’t let me get beaten up behind the bike sheds on my first day!), I’ve been making an effort to organize the detritus of my online life.

Loyal readers of this blog—if indeed such emotionally troubled individuals are currently blessed with reading privileges in the various jailhouses and detention centers they occupy—will recall my inaugural post about a password manager application I’ve been using called 1Password, made by a Canadian software company called AgileBits. As the name “1Password” suggests, the (IMO truly magnificent) app allows you to create one strong, memorable password that gives you access to a database into which you can enter all your other Web site log-in credentials, the passwords for which can be as strong and unmemorable as you wish. As if this functionality were not useful enough, the app also gives you the ability to log in to your favorite Web sites automatically, which in effect frees you from the very 21st-century hassle of entering slight variants of the same credentials into Web-based log-in forms time after tedious time.

In more recent days I’ve also been exploring some of 1Password’s additional capabilities, such as the way it allows you to store personal information (e.g., bank account, credit card and driver’s license information), in what the app calls “Wallet items.” Given my increasing reliance on the Web for performing financial and commercial transactions, having this information stored centrally in such a fashion has been proving pretty useful. Now, for instance, I don’t have to search my coat pockets for my actual wallet whenever I need my credit card for Turnov’s Small and Short men’s shop, a card whose number, expiry date and security code have escaped—or indeed have never been stored in—my memory. This liberating upshot is all the more satisfying given the numerous types of coat I’ve had to wear this winter here in the environs of Alexandria, Va., where the weather has been changing as much as a chameleon with multiple personality disorder in a dressing room.

To turn to, or at least look askance at, the subject of email organization, I’ve also been striving to exert a measure of control over my hitherto untamed Gmail inbox. This effort has necessitated creating a large number of labels and a not small number of filters. I now have as many as 17 top-level labels for my received mail, each of which has sub-labels that allow for more specific content characterization. Without wishing to give you too much insight into my personal life, here are the top-level labels I’ve settled on to-date:

  • Banking
  • Car (“Pollution-Spewing Heap of Rust” would be more accurate)
  • Credit Cards
  • Entertainment
  • Health & Fitness (just the one email under this label so far)
  • Home
  • Insurance
  • Investments
  • Local Government
  • Meetups (nice to get out of Chez Smith from time to time)
  • Personal
  • Personal Finance
  • Shopping
  • Taxes (would “Death and Taxes” last longer?)
  • Travel & Transit
  • Web Services
  • Work

Readers who take their mobility for granted might argue that going to such organizational lengths as these evinces a certain anal-retentiveness in me. And while I wouldn’t render them entirely unable to walk for arguing this way, I would suggest that if the feeling one gets from having an organized inbox is preferable to the feeling one gets from having a disorganized inbox, then the better feeling alone justifies the effort one has made in organizing it. So there, with highly polished brass knobs on!

In conclusion, I think “personal information architecture” projects like these will increase in importance as our weird, wired world becomes more data-centric and IT-reliant. Instead of finishing with a supposition, however, I’ll finish with a question: Do you—my loyal, incarcerated readers—attempt to organize your inboxes? Or do you allow them to grow untamed, like the tangled hair of an aging hippie?

Creating an Interactive Number-Guessing Game With HTML, CSS and JavaScript (Part 2)

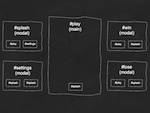
A diagram depicting the five user interface screens of my interactive number-guessing game.

This is the second in a series of posts on the creation of my interactive number-guessing game, which for the moment is called “Numbers Up”—I hope you like the name! The game is available on jsFiddle if you want to give it a whirl or tinker with the code.

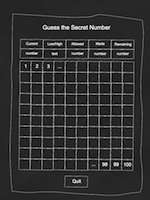
A diagram depicting the game screen of my interactive number-guessing game.

In the first post of the series I discussed the creation of the basic wireframe for the game. To summarize, I decided that the game’s user interface required five screens:

  1. A screen for the game interface;
  2. A “splash” (or introductory) screen;
  3. A screen where the game’s settings could be adjusted;
  4. A screen that would display in the event of the player’s winning the game; and
  5. A screen that would display in the event of the player’s losing the game.

I also decided that the screen for the game interface should occupy the main window, while the four other screens should be represented by modal dialogs.

First I’ll discuss the game interface screen. The HTML structure for the screen appears as follows:

<div id="outer-wrapper">
  <div id="inner-wrapper">
    <div id="play">
      <h1>Numbers Up</h1>
      <div id="game-board">
        <div id="gauges">
          <div id="guess">
            <span class="label">Current</span>
            <span class="value">
              <!-- guess -->
            </span>
          </div>
          <div id="guess-accuracy">
            <span class="label">Low/High</span>
            <span class="value">
              <!-- guess accuracy -->
            </span>
          </div>
          <div id="guesses-allowed">
            <span class="label">Allowed</span>
            <span class="value">
              <!-- guesses allowed -->
            </span>
          </div>
          <div id="guesses-made">
            <span class="label">Made</span>
            <span class="value">
              <!-- guesses made -->
            </span>
          </div>
          <div id="guesses-remaining">
            <span class="label">Remaining</span>
            <span class="value">
              <!-- guesses remaining -->
            </span>
          </div>
        </div>
        <div id="tiles">
          <!-- tiles -->
        </div>
      </div>
      <div class="buttons">
        <a href="#splash" class="button button-red dialog">Quit</a>
      </div>
    </div>
  </div>
</div>

Notice the comments that appear in div#tiles (a container for the game board tiles) and the span.value elements (containers for the game board gauge values). These comments represent content that was to be inserted into the DOM dynamically via JavaScript. I’ll return to the subject of the gauge values in a future post. I’ll tackle the subject of the game board tiles right away, however, as these would need to be inserted into the DOM before any user events could be attached to them. My prepareTiles function does just this:

function prepareTiles () {
  var tiles = '',
	  tile,
	lowTile = settings.lowTile,
	highTile = settings.highTile;
  for (var i = lowTile; i < (highTile + 1); i++) {
	tile = '<a class="tile" href="#' + i + '">' + i + '</a>';
	tiles += '
‘ + tile + ‘

‘; } $(‘#tiles’).append(tiles); }

In this function I use a JS for loop to build an HTML string representing the game board tiles. The loop begins at the number of the lowest tile (lowTile) and ends at the number of the highest tile (highTile). After the loop has finished I use jQuery’s append method to insert the HTML string into the DOM. Notice that the entire HTML string is built before it’s appended to the DOM. This way the DOM needs to be accessed only once rather than the 100 times it would need to have been accessed had each tile been appended individually–an important performance consideration. The settings object I refer to during the function’s variable instantiation relates to an object I created to store information about the game, such as UI strings, overlay properties, and, in this case, the numbers of the lowest and highest tiles.

My next task was to prepare the modal dialogs. Each dialog is represented in the HTML structure by a div element with a class of “dialog”. To transform these frumpy HTML elements into sexy modal dialogs I used the Overlay component provided by the jQuery Tools UI library. My prepareDialogs function takes care of this:

function prepareDialogs () {
  $('div.dialog').each(function (index) {
	var el = $(this);
	(index === 0) ? el.overlay($.extend({}, overlays.attributes.basic, overlays.attributes.autoload)) : el.overlay(overlays.attributes.basic);
  });
}

In this function I use jQuery’s each method to loop through the collection of div.dialog elements. I then call jQuery Tools’ overlay method on each element in the collection to bestow it with modal-dialog functionality. The element that appears first in the collection (i.e., the element whose index is equal to zero)—in this case, the div element containing the splash screen content—is required to load automatically, while the other dialogs are required to load manually (i.e., upon the activation of some triggering element). To implement this distinct functionality, I use jQuery’s extend method to merge two separate configuration objects. The first object stores properties common to all overlays; the second object stores properties common to automatically triggered overlays. The following code snippet, which forms part of the settings object I introduced earlier, represents the configuration objects:

…
overlays: {
  attributes: {
    basic: {
      closeOnClick:false,
      mask: {
        color:'#333',
        loadSpeed:100,
        maskId: 'mask',
        opacity:0.75,
        zIndex:9998
      },
      oneInstance:false
    },
    autoload: {
      load:true
    }
  }
}
…

My next task was to prepare the elements that would act as triggers for the modal dialogs. If you examine the first of the UI diagrams you’ll see that six such elements exist:

  1. The splash button in the game-board screen
  2. The settings button in the splash dialog
  3. The first splash button in the settings dialog
  4. The second splash button in the settings dialog
  5. The splash button in the win dialog
  6. The splash button in the lose dialog

Each button is represented in the HTML structure by an a element with a class of “dialog.” My prepareDialogTriggers function bestows each element with its dialog-triggering functionality:

function prepareDialogTriggers () {
  $('a.dialog').each(function () {
	var el = $(this),
	  href = el.attr('href'),
	  id = href.slice(1);
	el.attr('rel', href).overlay(overlays.attributes.basic).bind('click', function (e) {
	  openOverlay(id);
	  e.preventDefault();
	});
  });
}

In this function I again turn to jQuery’s each method, this time to loop through the collection of a.dialog elements. The href variable saves the value of the a element’s href attribute; the id variable saves the value of the anchor’s href attribute excluding the hash mark (i.e., the value of the id attribute of the div element corresponding to the dialog to be triggered). For the sake of jQuery Tools’ overlay method, I then add to each anchor element a rel attribute using the value saved in the href variable. I then call jQuery Tools’ overlay method on the a element, passing a configuration object to the method specifying that the dialog should be loaded manually. Finally I use jQuery to attach a click event to the anchor element, specifying the requisite additional behavior in the event’s callback function. jQuery users will know that the preventDefault method, when attached to an event object, cancels the default behavior that occurs upon the firing of an event—in this case, it prevents the browser from resolving the URL found in the a element’s href attribute. My openOverlay function, meanwhile, specifies additional behavior that’s required for the purposes of my particular application:

function openOverlay (id) {
  $('div.dialog').hide();
  $.mask.getMask().show();
  $('div[id=' + id + ']').show();
}

In this function I use jQuery’s hide method to hide all other div.dialog elements. I then use the jQuery Tools API to retrieve and show the UI library’s overlay mask (the darkened background that appears when a modal dialog is opened). I then use jQuery’s show method to show the necessary dialog, i.e., the div element with an id attribute whose value corresponds to the value saved in the prepareDialogs function’s id variable, which is passed into openOverlay as its only argument.

With that said (and the word count of this post rapidly approaching the 1250 mark!), I’ll conclude this week’s installment. Be sure to come back next week for another!

Creating an Interactive Number-Guessing Game With HTML, CSS and JavaScript (Part 1)

Less than two weeks ago I claimed on the homepage of this very Web site to have made a promise to myself to keep this blog up-to-date with weekly posts. As I didn’t get around to posting anything last week, it transpires it took me only a few days to break this promise. For this appalling inconstancy, you may rest assured that I’m not letting myself off lightly: Much to my chagrin I’ve been giving myself the silent treatment all week.

The only defense I can offer in my, uh, defense, is that I’ve been as busy as the proverbial bee. To continue the apicultural metaphor, you might even say my home office has been a hive of activity. Bad punning aside, what I’ve mainly been up to for the last several days is working on a coding test for a potential employer. Since I’ve been off work for a couple of months it was nice to get my teeth into a coding project again, so nice in fact that I’ve decided to make it the subject of this very post! In recompense for last week’s lapse, I promise to make it doubly good!

So what was this coding test all about? Well, it involved writing a program for an interactive game that gives the player 10 attempts to guess a “secret” number between 1 and 100. (If you’d prefer to play the game than read about its development, the fruits of my labor can be found on jsFiddle.) The specific requirements for the game were as follows:

  • The secret number should be known only to the program.
  • If the player succeeds in guessing the secret number before they’ve used up their attempts, they should be informed that they’ve won the game.
  • If the player fails in guessing the secret number before they’ve used up their attempts, they should be inform that they’ve lost the game.
  • The player should be informed of whether a specific guess is higher or lower than the secret number.
  • The player should be given the option of customizing the number of guesses they’re allowed.
  • At game’s end, the player should be given the option of replaying the game.
  • The programmer should make some attempt at styling the program’s user interface.

The language in which the program would be written was left to the programmer to decide. As such I had little hesitation in choosing JavaScript as the language I would use. I’ve been doing a lot of work with JS over the last year or two, and it’s the language I know best. I’ve also been doing a lot of work with JS libraries such as jQuery and jQuery Tools, and I was confident they would come in handy for the client-side scripting and UI components the program would require.

With this linguistic decision made, I turned my attention to the user interface. I wasn’t particularly concerned with the exact look-and-feel of the UI at this stage, but I thought it wise to devote some attention to the UI screens the requirements of the program would necessitate. I eventually determined that five separate screens would be required:

  1. A screen for the actual game interface.
  2. A “splash” screen from which the player could choose to either play the game or adjust its settings, i.e., the number of guesses the player is allowed.
  3. The settings screen itself. This screen would list the specific options for the number of guesses the player is allowed and would allow the player to confirm or cancel their selection.
  4. A screen that would appear upon the player’s winning the game. From this screen the player could choose to either replay the game (with the same settings) or return to the splash screen.
  5. A screen that would appear upon the player’s losing the game. This screen would give the player the same set of options as screen no. 4.

The following diagram depicts these five screens. Note that the hash-mark-prefixed names correspond to the IDs of the HTML elements I would go on to create for each screen, while the inner rectangles correspond to the buttons with which the player would need to interact in order to exit a particular screen. The screen’s window type (modal or main) is indicated in parentheses. Basically I decided that screen nos. 2 thru 5 should be represented by modal dialogs and that screen no. 1—the actual game interface—should occupy the main window.

A diagram depicting the five user interface screens of my interactive number-guessing game.

With this broad overview of the UI in mind, my next step was to form an idea of the actual game screen. I initially thought a drop-down menu would be a nice way of presenting the hundred different number choices to the player. However the multiple clicks that this would require of the player finally struck me as being awkward. I eventually decided that a tabular, or tiled, format would make for a more usable arrangement. Recall that the program requirements also called for a means of indicating to the player whether a specific guess was lower or higher than the secret number. I decided it would be convenient to place this information, along with some other data I deemed might be useful to the player, in a series of “gauges” that would appear above the numbered tiles. The following diagram depicts the layout I decided on:

A diagram depicting the game screen of my interactive number-guessing game.

The content for the other screens was a simpler matter. I decided that the splash screen would list the game’s features; the settings screen would list the options for the number of guesses the player was allowed to take; and the win and lose screens would output the secret number along with a message informing the player of whether they had won or lost the game.

With these high-level concerns addressed, I was now free to set about writing the application logic: a fitting subject, methinks, for my next blog post.

Create Friendlier WordPress URLs With the Apache Rewrite Module

This week on the Web has led me to several worthwhile technological discoveries. While I would have been—to plagiarize a Blackadderism—as excited as a very excited person who has a special reason to be excited to write about, say, running JavaScript-based macros in a Google Drive spreadsheet or editing live CSS with the User CSS extension for Safari, I’ve chosen instead to expound upon creating reader-friendly URLs in WordPress—a nicely self-referential topic when you consider that DavidSmithWeb (hereafter “DSW” if you’ll pardon the mock legalese) is itself based on WP.

A decided (and, in my experience, uncharacteristic for WP) awkwardness I encountered upon deploying my WP site for the first time was the decidedly unglamorous URLs the platform created for my pages. Here, for instance, is the URL it generated for my main blog page:

//www.davidsmithweb.com/?page_id=58

And here’s the one it generated for my last blog post:

//www.davidsmithweb.com/?p=72

Deeply unattractive, I’m sure you’ll agree. So how did I go about making them more appealing?

It all started with a little tweaking of my Apache configuration. I first needed to make sure my server’s rewrite module was available. The “mod_rewrite” module, as it’s known, “provides a rule-based rewriting engine to rewrite requested URLs on the fly,” according to the Apache documentation. While the specifics of the rewriting process are beyond the scope of this post (that, and I don’t yet know enough about regular expressions!), checking for and enabling the module was fairly straightforward. For a list of available Apache modules, I went to my command line and navigated to the “mods-available” directory:

cd /etc/apache2/mods-available

There I found. as expected, a file named “rewrite.load.”

I then enabled the module by returning to the command line and entering the a2enmod command followed by the name of the relevant module:

a2enmod rewrite

(Entering the “load” file extension appeared to be unnecessary.)

In order for the enabling to take effect I found it was also necessary to restart Apache. From the command line I did it thus:

service apache2 restart

I then navigated to the “mods-enabled” directory to confirm the module had indeed been enabled, i.e., that the “rewrite.load” file was present in the directory:

cd /etc/apache2/mods-enabled

With my command line duties done (at least for the time being), I then turned to the more aesthetically pleasing—if not quite as nerdy—WP administrative interface. WP conveniently offers the ability to create reader-friendly URLs via its “Permalink Settings” screen (under Settings > Permalinks). While the more adventurous WP users among us may wish to choose custom URL structures, the less daring may content themselves with the several predefined options WP offers. Ever the pioneer, I chose the following custom structure:

/blog/%year%/%monthnum%/%postname%/

The only slight inconvenience I encountered here was that I needed to make my “.htaccess” file writable by WP. To wit, I returned once more to the command line, navigated to my site’s public folder, and gave the “.htaccess” file full read-write permissions:

chmod 666 .htaccess

I then returned to WP to save the changes to my site’s permalink settings. Finally I returned to the command line to reinstate the “.htaccess” file’s original permissions:

chmod 644 .htaccess

And that, as they say, was that. Remember those dowdy-looking URLs we encountered at the top of the post? Let’s have a look at them now! Here’s the URL for my main blog page:

//www.davidsmithweb.com/blog/

And here’s the one for my last blog post:

//www.davidsmithweb.com/blog/2013/01/1password-the-summit-of-password-managers/

Much more enticing, I’m sure you’ll agree.


Note 1: At the command line I needed superuser privileges in order to tinker with my Apache configuration to the extent that was necessary, i.e., I preceded each command with sudo.


Note 2: Here are some details of my current system configuration, in case they’re helpful:

  • Ubuntu 12.04
  • Apache 2.2.22
  • WordPress 3.4

Note 3: Mileage may vary with the specific commands and directory structures described in this post.

1Password: The Summit of Password Managers?

If I were to suggest to you that global warming, population growth and password management were among the 21st century’s greatest problems, you would of course be perfectly justified in observing that only two of these topics deserve such weighty description: As we all know, the dangers to mankind of global warming are vastly overstated and in fact may be apocryphal.

Before any partisan bickering that my previous assertion might have provoked descends into outright violence, allow me to raise my voice above the din for a moment to plead, “I was only joking!” Compared to the mountainous environmental and demographic issues already identified, the personal tech problem of managing one’s Web site login credentials seems molehill-like indeed. Modest though its heights may be, however, they still must be scaled. It pleases me to report that with the aid of a trusty Sherpa I have in recent days been able to scale them!

Playing Tenzing Norgay to my Edmund Hillary is 1Password, a desktop password-management application from the privately held Canadian company AgileBits. According to the manufacturer’s Web site, versions for Mac, Windows, iPhone, iPad and Android are available. This discussion concerns 1Password 3 for Mac, which requires OS X Snow Leopard and higher. (Tiger and Leopard users, the manufacturer mollifies, can use 1Password 2 and sync their data with Snow Leopard or Lion.) A single-user license cost me $49.99 from the manufacturer’s Web site.

The central idea of 1Password is straightforward:

  1. You create a single, master password to the app.
  2. You enter your login credentials for any given Web site into the app’s database.
  3. The app, upon entry of the correct master password, gives you access to all the credentials you’ve entered.

The upshot is that you only have to remember one password (hence the name, duh!) in order to have access to your login credentials for any given site. This comes in especially handy if, like me, you have accumulated several variations of usernames and passwords since Web time (Berners-Lee time?) began. I, for instance, have amassed as many as 20 unique usernames!

Having only one password to remember also enables you to practice good Web security and create a strong, unique password for each of your stored sites. 1Password conveniently includes a random-password generator for the purpose. The generator features several password-customization options, including the number of characters the password should contain, the number of digits or special characters it should contain, whether it can contain the same character more than once, and even whether it should be pronounceable!

1Password also includes a delightfully time-saving auto-login feature, which alone justifies the app’s license fee IMHO. Double-click the name of any given Web site from within the app to be instantly directed to and logged into that site. For even quicker, one-click access, install the app’s Web browser extension, in which you can also perform other common tasks, such as data entry.

What happens if a Web site requires you to enter your username on one screen and your password on another? Simply create two records in the database: one for the username screen and one for the password screen, taking care to name each record meaningfully. Then simply choose the relevant record from the app or browser extension.

Do you use a Mac at home and a PC at work? Combine 1Password with the built-in 1PasswordAnywhere and the file-hosting service Dropbox for access to your login credentials from wherever you happen to be doing your Web browsing. In addition to login credentials, 1Password also promises the ability to store other types of sensitive information, such as software licenses, free-form text, and personal and financial information. I’m looking forward to trying these features out in the coming days.

In the meantime you can color me impressed. Although there may be freely available alternatives that perform just as well, I feel as though my money has been well-spent on 1Password. A piece of software that saves me time and makes me feel a bit more organized seems to me invaluable in this time-crunched era of ours. If these do not strike you as reasons enough to reach for the summit of your own password management mountain (or molehill), then why not turn to the sentiments of another celebrated Everest assaulter: Do it because it’s there!